


MATCH ON ACTION:
The screenshots above are from our preliminary task and our final opening shown in comparison. They both show an element of continuity editing which is Match-on-action which is the technique of one shot cutting to another, from a different angle or perspective, showing a specific piece of action n the scene. We experimented with continuity in our preliminary task with match on action by carrying on the action throughout different camera angles which creates a connection and almost a bridge between shots engaging the audience who will hence focus on the action itself rather than ruining the magic of cinematography by focusing on editing and cuts.
In our preliminary task, we attempted to use match on action multiple times when reaching potential barriers, such as walking through a door and turning a corner. This element of editing is important as it allows us to capture a moment/shot from two different angles whilst creating a smooth flowing shot which drifts the audience away from the cutting. When doing our preliminary task, we used a GE1080P hand held camera. This was just a basic camera which didn't have a very high resolution or many mega-pixels, this meant that the quality was not the best and some of the footage came out blurry. As shown above the quality was not as good, the close up of the hand was of a decent quality however it was much more difficult to precisely capture the long and medium shots. Again, as shown in the screen capture above, the medium shot of me walking through the door was not good quality and this therefore affected the editing techniques as it was not clear and didn't run as smoothly as expected. Another key aspect of the camera we used was the sound which again wasn't very good quality. From all of the barriers we found when doing our preliminary task, we learnt alot and were then able to make improvements in our final product.
When filming our opening scene, we used a Nikon L180 camera which had a much higher resolution and focus meaning the match on action technique ran smoothly. We used match on action multiple times in our opening; the two screenshots above show this where we performed the technique as the character stepped out of the car. The first shot we used was a medium shot revealing the door as it was opened and the action that was about to be made; we then cut to a close up of the man's foot. This cutting ran smoothly and you weren't actually able to identify the cut as it did not look messy.

SHOT REVERSE SHOT:
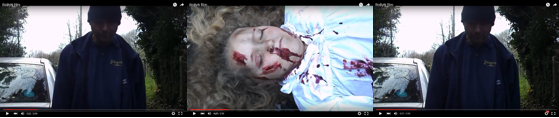
This was another editing technique which we used in our preliminary task and improved on in our final product. It is common that this technique is used during a conversation as we presented in our preliminary task. Although we applied the editing technique in that task, having used it in our final product, i believe that it was not the best that it could have been. As previously said, we used a GE1080P hand held camera which was not the best quality; this meant that the shots were not very clear. Further more, we hadn't used the editing software (Adobe Premier Elements) before meaning we weren't able to create a clean cut which meant that the editing technique was not used to our advantage. However, in our final production, we had alot of practice in both learning the different techniques and also using the editing software. The screenshots above show the difference between our preliminary task and the final product where the quality is much better and how there is clear evidence of eyeline match which is the aim with a shot reverse shot. The aim of this technique is mainly to show the connection between two characters and the direct contact, evidently shown in above in our final product where the male character is looking directly down at Robyn. As well as considering shot reverse shot and continuity editing revolving around this type of shot, we also focused on the 180 degree rule to ensure that whenever there were shots of the girl, or the antagonistic man we never went over the 180 degree line so the camera shots didn't appear scattered and uneasy, we learnt this through our preliminary task as well as keeping to rules of scene geography & the rule of thirds.
Overall, I feel like we benefited alot from doing the preliminary task as it was good practice for later applying the continuity editing techniques to our film. I also believe that this can be further developed next year when creating a trailer. The continuity techniques are very important in film and are things that viewers dont notice however they make the film more effective; and also show the high knowledge that a person has of film and editing.
No comments:
Post a Comment